Wednesday, June 6, 2012

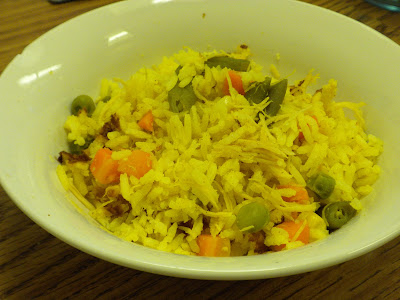
Madi's Chicken and Rice: Easy Garlic Curry Style!

So, a while ago I tried out my brother's rice cooker that he "let me borrow" cause he's the bomb-dot-com. I first tried just plain white rice. It turned out PERFECT! The FIRST time! I couldn't believe that I had been trying to cook rice myself on a stove! What a fool I've been! Needless to say, he's never getting the thing back. I told my mom about the experience. 

Me: It's the best thing ever. I love it! 
Mom: You know they have whole recipe books for rice cookers? 
Me: THEY DO??
Mom: Yeah, I'll send you one of my recipes for steel cut oats.
(PS: I've yet to try the recipe but it's on the list)
Me: Awesome! (Proceeds to Google "rice cooker recipes") 

Did I mention, I love my momma? Well I do. Anyways. Back to present time. 

I was fretting about making dinner since my friend always seems to outdo me in that area. I tend to make mac and cheese or chicken nuggets while he makes real food. Yesterday I was surprised with tacos that could only be beaten by my mom's. Now how do you outdo tacos on a college budget?? What did I have? ... A rice cooker!! Faster than a slow cooker and better than my own skills, I decided to experiment with my rice cooker. 

After researching a few recipes, I found a Tuna Curry recipe that sparked my own creativity! Here's what I came up with:

Ingredients
1 1/2 cups white rice
1 14.5 oz can Chicken Broth
1 12.5 oz can of Chicken (don't drain! Dump it all in and if it's a little too chunky, mash up the chicken a bit)
1 cup Mixed veggies (peas, carrots, corn, and green beans was the one I used)
1/2 tsp. cumin
1/2 tsp. turmeric
1/2 tsp. Coriander (technically you want masala but this works too)
3 cloves of garlic minced
Pinch of salt

Directions (my favorite part of this recipe)
1. Throw it all in a rice cooker.
2. Stir it all together.
3. Close lid and press appropriate setting*

*Mine has a setting for white rice so I just pressed that. It cooked for about 35 min. 


Yeah. It's that stinkin' easy! And pretty cheap. The cumin, tumeric, and coriander (or masala) are kinda pricey (for a college student who lives on $10 a week) BUT they are a staple for anything curry. So I consider them worth getting since I like curry dishes. 

The Verdict: 


Taste test - Approved!
College budget - Approved! 
Difficulty - Super Easy! 
Serves - 4 (or two and you have leftovers! A college student's friend!)
Mashed Potatoes: Just in case you do fail...

I have tried making mashed potatoes many times. You would think it would be a snap, right? And they would always turn out perfect, right? 


WRONG.
I don't know what it is but for some reason, I have yet to make perfect mashed potatoes. Maybe one day... But for now I've gotten pretty good at improvising with what I have. I may not be the best cook, but I'm quite good at figuring out how to salvage a disaster of a dish.


Some of you may be asking: How in the world do you mess up mashed potatoes?? My answer (and my answer to almost anything you ask me): Magic. But seriously, it is often due to the cause that they are too... creamy? Milky? Not the thick mashed potatoes one usually gets. So if you're like me and have this problem, don't worry. I have hope and a solution for you!


FRY 'EM! Yes. You read that right. It's so very simple and is my answer for almost all my cooking problems. I do believe the movie Tangled was on to something when they showed the enormous potential of the frying pan. I personally have my own trusty frying pan that I acquired through my mom.
You go girl. 
Here's the trick. Don't add butter or Pam or vegetable oil. The extra liquid in the potatoes will do that job. And no one really wants the extra fat do they?
I will add a word of caution: have a guard of some sort over your frying pan (as a poor college student, I use a paper towel). This makes it so you don't get splattered with potatoes.

To make your fried mashed potato patties, heat up your pan a little and be ready with your cover for the pan. Then take a spoon full of your mashed potatoes and place it in the pan. Cover it and let it fry. When you see the sides browning, it's time to flip them. Don't worry if they fall apart. It still tastes good. When they are as brown as you want them, slide them onto a plate. Enjoy! (but don't burn your tongue!)


Use as a side with:
fried eggs
bacon
pancakes
toast and cream cheese
chicken and waffles
dinosaur chicken nuggets <----- Favorite
turkey
ham
fish
gravy
teryaki sauce/soy sauce
or whatever you like with potatoes!


Another meal saved in a no fail way. Really the only way you can fail this recipe is if you don't have that guard and give yourself a burn. Ouch!

Monday, February 27, 2012

Variations of No Fail Pretzels

Today I saw a picture of some pretzel bites and thought, those look so YUMMY! I looked at the recipe for them and was a little intimidated by the words "yeast". Always looking for a simpler way to make something, I decided to search for any yeast-less recipes. This is the one I tried today that worked pretty well, if I do say so myself. *I will star my variations.

Prep Time: 10 min <--- me being me, this did not happen. More like 20 min.
Cook Time: 15 min
Total Time: 25 min

Ingredients:
1 1/2 cups all-purpose flour
2 teaspoons baking powder
1/2 teaspoon salt
1 teaspoon sugar
2 tablespoons margarine
1/2 cup (2 ounces) shredded mild Cheddar cheese *(didn't add this in because I didn't have any)
2/3 cup milk
1 egg, beaten
1 1/2 teaspoons coarse salt *(used cinnamon and sugar for some and Santa Maria style seasoning for others)

Prep:
Combine first 4 ingredients in a medium bowl; cut in margarine with a pastry blender *(I used an electric mixer; works just fine!) until mixture resembles coarse meal. Add cheese and milk *(or just milk if that is all you got), stirring until dry ingredients are just moistened. Turn dough out onto a lightly floured surface and knead about 12 times. 

Divide dough in half and roll each half into a 12x8-inch rectangle. Cut dough lengthwise into eight 1 inch strips. Twist each into a pretzel shape *(OR take a small chunk of dough in your hand. It should fit in the palm of your hand. I like to flour my hand lightly so that dough doesn't stick to me. Roll this out like you used to roll out snakes with play-dough. Spread your fingers out when the dough gets longer so it doesn't roll out of control. Twist this into a pretzel shape and place on greased pan); brush with beaten egg and sprinkle with coarse salt *(or whatever you'd like to top your pretzel with). Bake at 400 degrees for fifteen min or until golden brown. Cool pretzels for a few min on wire racks; serce pretzels warm. 
Makes about 16 pretzels


This is how my first batch turned out. 
I noticed that the smaller ones didn't have as soft a center as the thicker ones. So if you like your pretzels softer, make them thicker when you're rolling them out. Santa Maria seasoned pretzels tasted AWESOME (but of course it is my favorite seasoning) and the cinnamon and sugar ones could have used a little bit more sugar and cinnamon. All in all, very yummy!

Second batch:

Followed the above recipe but when you're adding the milk, I added Hershey's chocolate syrup to it, just to see if I could make chocolate pretzels. It makes the dough stickier though. I added a little more flour at the end before I kneaded the dough to account for the stickiness. The second alteration I made was adding a Reese's peanut butter cup to the mix. I made a dough ball, flattened the dough, and placed the peanut butter cup in the middle and rap the candy in the dough. Sprinkle with sugar after brushing with egg and bake like the other ones.

This is how the second batch turned out.
As you can see, some of the guts of the candy pretzels decided to spill out. I'm not sure how to fix this. 
These didn't really taste all that chocolaty though, except the ones with the candy in the middle. They tasted sweeter though. Very yummy!


That's it for today! Keep cooking out there! We'll see what the next recipe I find is!